America's Test Kitchen host and Cook's Illustrated magazine editor in chief Christopher Kimball is here with his latest creation --a 900-page cookbook!-- on Chicago Tonight at 7:00 pm.
Check out some recipes from America's Test Kitchen below.
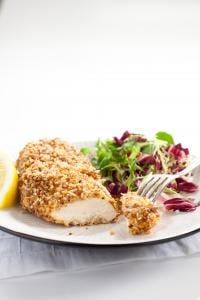
NUT-CRUSTED CHICKEN BREASTS
Why This Recipe Works
Adding chopped nuts to a coating is a great way to add robust flavor to otherwise lean and mild boneless, skinless chicken breasts. But nut coatings are often dense and leaden, and the rich flavor of the nuts rarely comes through. Using a combination of chopped almonds and panko bread crumbs—rather than all nuts—kept the coating light and crunchy, and the bread crumbs helped the coating adhere. Instead of frying the breaded cutlets, we found that baking them in the oven was not only easier, but also helped the meat stay juicy and ensured an even golden crust. But it wasn’t until we cooked the coating in browned butter prior to breading the chicken that we finally achieved the deep nutty flavor we sought.
NUT-CRUSTED CHICKEN BREASTS WITH LEMON AND THYME
Serves 4
This recipe is best with almonds, but works well with any type of nut. We prefer kosher salt in this recipe. If using table salt, reduce salt amounts by half.4 (6- to 8-ounce) boneless, skinless chicken breasts, tenderloins removed, trimmed, Kosher salt
1 cup almonds, chopped coarse
4 tablespoons unsalted butter
1 shallot, minced
1 cup panko bread crumbs
2 teaspoons finely grated lemon zest, zested lemon cut into wedges
1 teaspoon minced fresh thyme
⅛ teaspoon cayenne pepper
1 cup all-purpose flour
3 large eggs
2 teaspoons Dijon mustard
¼ teaspoon pepper1. Adjust oven rack to lower-middle position and heat oven to 350 degrees. Set wire rack in rimmed baking sheet. Pat chicken dry with paper towels. Using fork, poke thickest half of breasts 5 to 6 times and sprinkle with ½ teaspoon salt. Transfer breasts to prepared wire rack and refrigerate, uncovered, while preparing coating.
2. Pulse almonds in food processor until they resemble coarse meal, about 20 pulses. Melt butter in 12-inch skillet over medium heat, swirling occasionally, until butter is browned and releases nutty aroma, 4 to 5 minutes. Add shallot and ½ teaspoon salt and cook, stirring constantly, until just beginning to brown, about 3 minutes. Reduce heat to medium-low, add bread crumbs and ground almonds and cook, stirring often, until golden brown, 10 to 12 minutes. Transfer panko mixture to shallow dish or pie plate and stir in lemon zest, thyme, and cayenne. Place flour in second dish. Lightly beat eggs, mustard, and pepper together in third dish.
3. Pat chicken dry with paper towels. Working with 1 breast at a time, dredge in flour, shaking off excess, then coat with egg mixture, allowing excess to drip off. Coat all sides of breast with panko mixture, pressing gently so that crumbs adhere. Return breaded breasts to wire rack.
4. Bake until chicken registers 160 degrees, 20 to 25 minutes. Let chicken rest for 5 minutes before serving with lemon wedges.
NUT-CRUSTED CHICKEN BREASTS WITH ORANGE AND OREGANO
This version works particularly well with pistachios or hazelnuts.
Substitute 1 teaspoon grated orange zest for lemon zest (cutting zested orange into wedges) and 1 teaspoon minced fresh oregano for thyme.NUT-CRUSTED CHICKEN BREASTS WITH LIME AND CHIPOTLE
This version works particularly well with peanuts.
Substitute 1 teaspoon grated lime zest for lemon zest (cutting zested lime into wedges). Omit thyme and add 1 teaspoon chipotle chile powder, ½ teaspoon ground cumin, and ½ teaspoon ground coriander to toasted panko along with lime zest.PECAN-CRUSTED CHICKEN BREASTS WITH BACON
Substitute 1 cup pecans, coarsely chopped, for almonds. Cook 2 finely chopped slices bacon in 12-inch skillet over medium heat until crisp, 5 to 7 minutes. Remove bacon from skillet with slotted spoon and transfer to paper towel–lined plate. Pour off all but 2 tablespoons fat left in skillet. Reduce butter to 2 tablespoons and melt in fat left in skillet over medium heat before adding shallot. Increase shallots to 2. Omit lemon zest and lemon wedges and substitute 1 tablespoon minced fresh parsley for thyme. Add crisp bacon to toasted panko along with parsley.
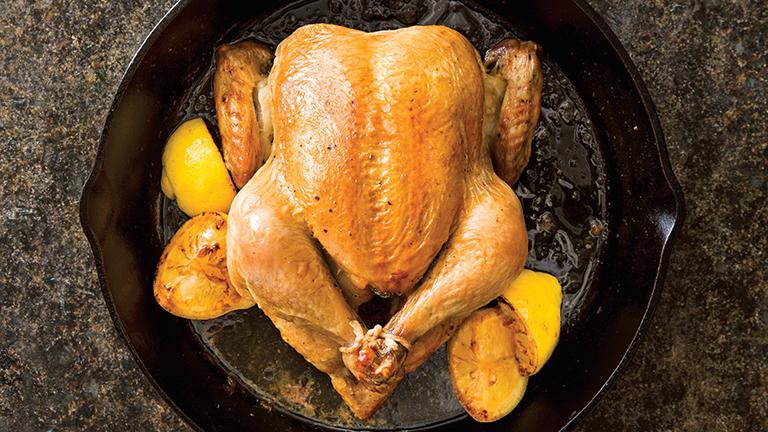
HERBED ROAST TURKEY
Why This Recipe Works
Herbed roast turkey is a welcome alternative to the annual plain roasted bird, but getting great herb flavor in every bite is a challenge. After attempting to add herb flavor a variety of ways—through brining, injecting, and butterflying—we realized the answer was relatively simple. We made a vertical slit in the breast meat with a paring knife and then swept the blade back and forth. This created a pocket into which we could rub a small amount of herb paste (a combination of parsley, thyme, sage, rosemary, shallot, garlic, lemon zest, mustard, and oil). We used the same paste in three other applications—underneath the skin, inside the cavity, and over the skin—to give the turkey fragrant herb flavor throughout.HERBED ROAST TURKEY
Serves 10 to 12
If using a self-basting turkey or kosher turkey, do not brine in step 1. If you have the time and the refrigerator space, air-drying produces extremely crisp skin and is worth the effort. After brining and patting the turkey dry, place the turkey breast side up on a wire rack set in a rimmed baking sheet and refrigerate, uncovered, for 8 to 24 hours. Proceed with the recipe.Turkey and Brine
1 cup salt
1 (12- to 14-pound) turkey, trimmed, neck, giblets, and tailpiece removed and discarded
1 recipe All-Purpose Gravy*
Herb Paste
1 ¼ cups chopped fresh parsley
4 teaspoons minced fresh thyme
2 teaspoons chopped fresh sage
1 ½ teaspoons minced fresh rosemary
1 shallot, minced
2 garlic cloves, minced
¾ teaspoon grated lemon zest
¾ teaspoon salt
1 teaspoon pepper
¼ cup olive oil
1 teaspoon Dijon mustard1. For the turkey and brine: Dissolve salt in 2 gallons cold water in large container. Submerge turkey in brine, cover, and refrigerate or store in very cool spot (40 degrees or less) for 6 to 12 hours.
2. Remove turkey from brine and pat dry, inside and out, with paper towels. Place turkey, breast side up, on wire rack set in rimmed baking sheet or roasting pan and refrigerate, uncovered, for 30 minutes.
3. For the herb paste: Pulse parsley, thyme, sage, rosemary, shallot, garlic, lemon zest, salt, and pepper together in food processor until coarse paste is formed, 10 pulses. Add oil and mustard; continue to pulse until mixture forms smooth paste, 10 to 12 two-second pulses; scrape bowl with rubber spatula after 5 pulses. Transfer mixture to bowl.
4. To prepare the turkey: Adjust oven rack to lowest position and heat oven to 400 degrees. Line V-rack with heavy-duty aluminum foil and poke several holes in foil. Set V-rack in roasting pan and spray foil with vegetable oil spray. Remove turkey from refrigerator and wipe away any water collected in baking sheet; set turkey breast side up on baking sheet.
5. Using your fingers, gently loosen skin covering breast, thighs, and drumsticks. Place 11/2 tablespoons paste under breast skin on each side of turkey. Gently press on skin to distribute paste over breast, thigh, and drumstick meat.
6. Using sharp paring knife, cut 11/2‑inch vertical slit into thickest part of each side of breast. Starting from top of incision, swing knife tip down to create 4- to 5-inch pocket within flesh. Place 1 tablespoon paste in pocket of each side of breast; using your fingers, rub paste in thin, even layer.
7. Rub 1 tablespoon paste inside turkey cavity. Rotate turkey breast side down; apply half of remaining herb paste to turkey skin; flip turkey breast side up and apply remaining herb paste to skin, pressing and patting to make paste adhere; reapply herb paste that falls onto baking sheet. Tuck tips of drumsticks into skin at tail to secure, and tuck wings behind back.
8. To roast the turkey: Place turkey breast side down on prepared V-rack. Roast turkey for 45 minutes.
9. Remove pan from oven. Using 2 large wads of paper towels, rotate turkey breast side up. Continue to roast until breast registers 160 degrees and thighs register 175 degrees, 50 to 60 minutes longer. Transfer turkey to carving board and let rest, uncovered, for 30 minutes. Carve turkey and serve with gravy.
*ALL-PURPOSE GRAVY
Why This Recipe Works
Gravy is an ideal accompaniment to a variety of dishes, not just holiday roasts. We wanted a top-notch all-purpose gravy without having to rely on the juices and pan drippings from a roast. For the liquid component, equal amounts of chicken broth and beef broth struck just the right balance. To develop a pleasant roasted flavor without roasted meat, we found that if we extended the cooking time of our mirepoix (a combination of carrots, onions, and celery), the vegetables would brown and develop a rich fond on the bottom of the pan. After sautéing the vegetables in butter, we added flour to form a roux and cooked it for a long time until it was the color of milk chocolate; this toasted roux provided an unexpectedly rich, roasted flavor.ALL-PURPOSE GRAVY
Makes 2 cups
This gravy can be served with almost any type of poultry or meat or with mashed potatoes. If you would like to double the recipe, use a Dutch oven to give the vegetables ample space for browning and increase the cooking times by roughly 50 percent.1 small carrot, peeled and chopped
1 small celery rib, chopped
1 small onion, chopped
3 tablespoons unsalted butter
¼ cup all-purpose flour
2 cups low-sodium chicken broth
2 cups beef broth
1 bay leaf
¼ teaspoon dried thyme
5 whole black peppercorns
Salt and pepper1. Pulse carrot in food processor until broken into rough ¼-inch pieces, about 5 pulses. Add celery and onion; pulse until all vegetables are broken into 1/8-inch pieces, about 5 pulses.
2. Melt butter in large saucepan over medium-high heat. Add vegetables and cook, stirring often, until softened and well browned, about 7 minutes. Reduce heat to medium; add flour and cook, stirring constantly, until thoroughly browned and fragrant, about 5 minutes. Slowly whisk in chicken broth and beef broth; bring to boil, skimming off any foam that forms on surface. Add bay leaf, thyme, and peppercorns, reduce to simmer, and cook, stirring occasionally, until thickened and measures 3 cups, 20 to 25 minutes.
3. Strain gravy into clean saucepan, pressing on solids to extract as much liquid as possible; discard solids. Season with salt and pepper to taste and serve.
To Make Ahead: Finished gravy can be frozen for up to 1 month. To thaw either single or double recipe, place gravy and 1 tablespoon water in saucepan over low heat and bring slowly to simmer. Gravy may appear broken or curdled as it thaws, but vigorous whisking will recombine it.
ULTIMATE CHOCOLATE CHIP COOKIES
Why This Recipe Works
Since Nestlé first began printing the recipe for Toll House cookies on the back of chocolate chip bags in 1939, generations of bakers have packed chocolate chip cookies into lunches and taken them to potlucks. But after a few samples, we wondered if this was really the best that a chocolate chip cookie could be. We wanted to refine this recipe to create a moist and chewy chocolate chip cookie with crisp edges and deep notes of toffee and butterscotch to balance its sweetness—in short, a more sophisticated cookie than the standard bake-sale offering. Melting a generous amount of butter before combining it with other ingredients gave us the chewy texture we wanted. Since we were melting butter, we browned a portion of it to add nutty flavor. Using a bit more brown sugar than white sugar enhanced chewiness, while a combination of one egg and one egg yolk gave us supremely moist cookies. For the crisp edges and deep toffee flavor, we allowed the sugar to dissolve and rest in the melted butter. We baked the cookies until golden brown and just set, but still soft in the center. The resulting cookies were crisp and chewy and gooey with chocolate, and boasted a complex medley of sweet, buttery, caramel, and toffee flavors.ULTIMATE CHOCOLATE CHIP COOKIES
Makes about 16 Large Cookies
Avoid using a nonstick skillet to brown the butter; the dark color of the nonstick coating makes it difficult to gauge when the butter is sufficiently browned. Use fresh, moist brown sugar, as hardened brown sugar will make the cookies too dry. This recipe works with light brown sugar, but the cookies will be less full-flavored.
1¾ cups (8¾ ounces) all-purpose flour
½ teaspoon baking soda
14 tablespoons unsalted butter
¾ cup packed (5¼ ounces) dark brown sugar
½ cup (3½ ounces) granulated sugar
1 teaspoon salt
2 teaspoons vanilla extract
1 large egg plus 1 large yolk
1¼ cups (7½ ounces) semisweet chocolate chips or chunks
¾ cup pecans or walnuts, toasted and chopped (optional)1. Adjust oven rack to middle position and heat oven to 375 degrees. Line 2 baking sheets with parchment paper. Whisk flour and baking soda together in medium bowl; set aside.
2. Melt 10 tablespoons butter in 10-inch skillet over medium-high heat. Continue cooking, swirling pan constantly, until butter is dark golden brown and has nutty aroma, 1 to 3 minutes. Transfer browned butter to large heatproof bowl. Add remaining 4 tablespoons butter and stir until completely melted.
3. Add brown sugar, granulated sugar, salt, and vanilla to melted butter; whisk until fully incorporated. Add egg and egg yolk; whisk until mixture is smooth with no sugar lumps remaining, about 30 seconds. Let mixture stand for 3 minutes, then whisk for 30 seconds. Repeat process of resting and whisking 2 more times until mixture is thick, smooth, and shiny. Using rubber spatula, stir in flour mixture until just combined, about 1 minute. Stir in chocolate chips and nuts, if using. Give dough final stir to ensure that no flour pockets remain and ingredients are evenly distributed.
4. Working with 3 tablespoons of dough at a time, roll into balls and place 2 inches apart on prepared baking sheets.
5. Bake 1 sheet at a time until cookies are golden brown and still puffy and edges have begun to set but centers are still soft, 10 to 14 minutes, rotating baking sheet halfway through baking. Transfer baking sheet to wire rack; let cookies cool to room temperature.
TEST KITCHEN TIP NO. 130 CLEAN RELEASE FOR COOKIES
You might be tempted to grease the baking sheet or spray it with vegetable oil spray—don’t. The extra fat will cause the cookies to spread and bake unevenly. We prefer parchment paper for lining our baking sheets. Its slick surface prevents sticking, so we don’t need to wrestle cookies from baking sheets. But what if you’re out of parchment? There is a solution—aluminum foil. While the cookies stick a little, you’ll be able to gently lift them off the foil.
For more recipes and information, please visit the links below.


